MCP (Model Context Protocol)
Model Context Protocol (MCP) lets you connect external servers that provide domain-specific tools, prompts, and resources.
After connection, the platform automatically discovers available tools and adds them to your agent's registry. In the platform hierarchy, MCP is positioned as a high-priority integration, located directly below AI Models and above CRM and OpenAPI Tools.
Key Features
- Automatic Tool Discovery: Real-time synchronization with remote MCP servers.
- Transparent Tool List: View all discovered tools directly in the integration table (second column) on the Agent screen.
- High Priority: Positioned above CRM and OpenAPI integrations for faster access.
- Fine-grained Control: Advanced name transformations and filtering (Include/Exclude rules).
- Flexible Transport: Support for
streamable_http,http_sse, andstdio(local processes).
How MCP Tools Work
The integration process follows a structured three-step workflow as shown in the diagram below:
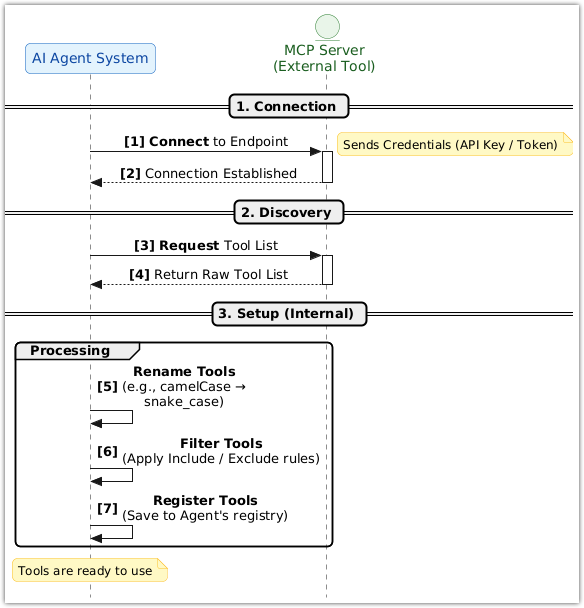
1. Connection
The AI Agent System establishes a link with the MCP Server using the specified Endpoint and Transport Protocol. Authentication is handled via credentials (API Keys, Bearer Tokens, etc.) defined in the configuration.
2. Discovery
Once the connection is established, the platform sends a Discovery Request. The MCP Server returns a Raw Tool List containing all functions and capabilities it provides.
3. Setup & Processing (Internal)
The system processes the raw list before making tools available to the agent:
- Rename Tools: Applies Name Transformers (for example, converting
camelCasetosnake_case). - Filter Tools: Applies Include/Exclude rules to hide internal or debug functions.
- Register Tools: Tools are saved to the Agent's registry and displayed in the Tool List column on the agent's integration screen.
Basic Setup
How to Set Up an MCP Integration
MCP integrations are managed in the global Connectivity section.
- Go to Settings > Connectivity.
- Open the MCP category and select MCP Tools.
- In the upper-right corner, press Add +.
- Fill in the required fields: Name, Integration Code, and Server Endpoint.
- Select the Transport Protocol and Authentication Type.
- Press Save.
💡 Note: After saving, the Tool list field in the configuration will be automatically populated with tools discovered from your server.
How to Connect to Agent
After creating the integration in Connectivity, you must enable it for a specific agent:
- Navigate to the Agents section and open your agent.
- In the right sidebar, go to the Integrations section.
- The MCP line will appear above OpenAPI Tools. Select your configured MCP server.
- Verify the discovered tools in the Tool List column (second column of the table).
- Add the specific tool names to your agent's Workflow in the
available_toolssection:
available_tools:
  SingleStatefulOutboundAgent:
    - SendChatMessage
    - your_mcp_tool_name  # The name as it appears in the Tool List
- Press Save and restart the agent to apply changes.
For a full list of configuration parameters, see the Configuration Reference.